To coat a floor with epoxy, first assess the concrete surface for moisture and damage, then clean and prepare the surface through degreasing and etching. Repair any cracks or imperfections with patching compound, apply optional primer, and mix the epoxy components according to manufacturer's specifications.
Roll the epoxy coating in overlapping passes, add decorative flakes if desired, allow proper curing time, and apply a second coat. Complete the process with adequate ventilation during full curing and establish regular maintenance with neutral-pH cleaners.
Here are the key steps to coat a floor with epoxy:
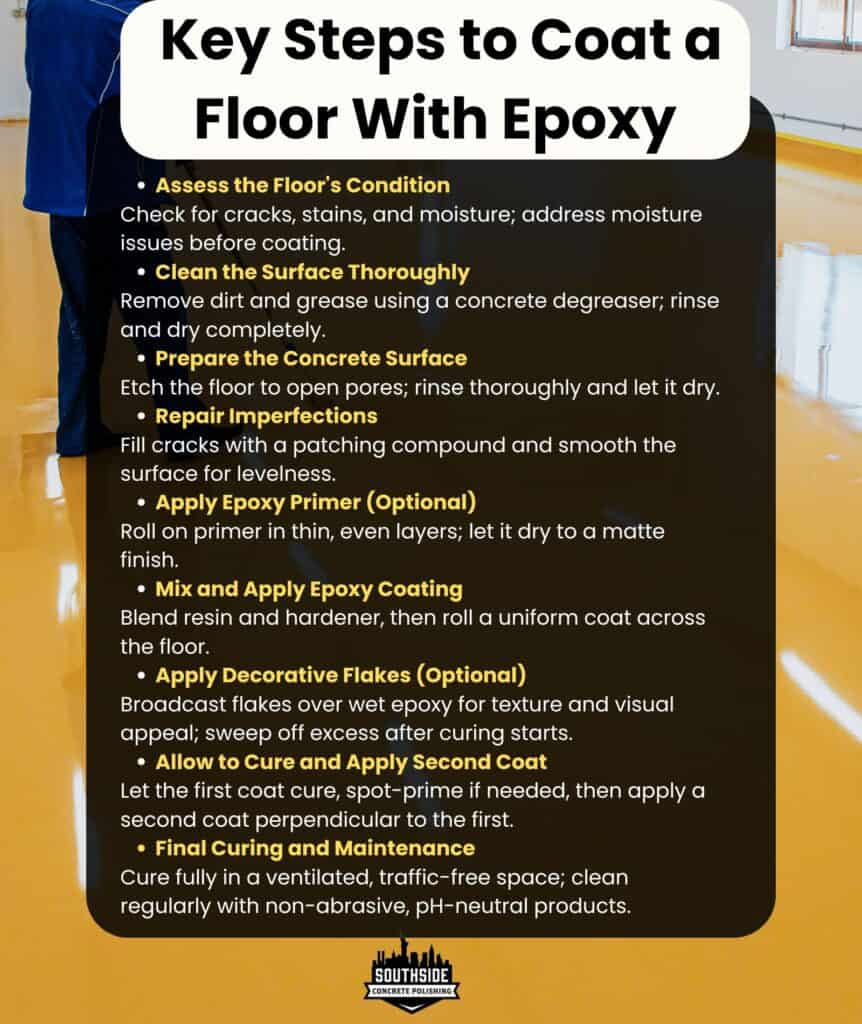
Assess the Floor's Condition
Inspect the concrete surface for any cracks, chips, or deep stains. Place a square of plastic on the floor and tape its edges. After 24 hours, check for condensation under the plastic. Any moisture indicates the need for a moisture mitigation system before coating.
Clean the Surface Thoroughly
Begin by sweeping or vacuuming to remove loose dirt and debris. Apply a concrete-specific degreaser with a stiff-bristled brush, focusing on oil and grease spots. Rinse the floor with fresh water, using a wet‑vacuum or squeegee to extract all liquid. Allow the slab to air‑dry until no dampness remains.
Prepare the Concrete Surface
Pour an etching solution over the floor and spread it with a push broom, working methodically across the entire area. Agitate stubborn spots until all pores open. Rinse the surface repeatedly until the runoff runs clear. Let the slab dry completely before proceeding.
Repair Imperfections
Mix a polymer‑enhanced patching compound and force it into cracks and holes with a trowel. Strike off excess material to leave the surface flush. After the patch cures, use a floor sander or diamond grinding wheel to smooth transition areas and ensure levelness across the entire slab.
Apply Epoxy Primer (Optional)
Stir the primer components together until fully blended. Pour small amounts onto the floor and roll out thin, even sections, maintaining a "wet edge" to avoid lap marks. Observe the primer's working time, ensuring no pooling or uneven build‑up. Allow the primed floor to dry until it returns to a matte finish.
Mix and Apply Epoxy Coating
Combine the resin and hardener in a clean mixing bucket, scraping the sides and bottom to incorporate all material. Transfer the mixed epoxy into a paint tray. Starting in the far corner, roll a uniform coat, overlapping each pass. Keep a consistent roller angle and pressure to achieve an even thickness.
Apply Decorative Flakes (Optional)
Immediately after rolling the epoxy, toss flakes by hand or with a broadcast tool, aiming for 50--75% coverage. Drop extra flakes in bare spots to create a consistent pattern. Allow the base coat to begin firming before sweeping away loose flakes to reveal a smooth, textured surface.
Allow to Cure and Apply The Second Coat
Leave the first coat undisturbed for the manufacturer's specified cure time. Inspect the surface for pinholes or thin areas and spot‑prime those sections. Mix a fresh batch of epoxy and roll out the second coat perpendicular to the first, ensuring full saturation of the flake layer.
Final Curing and Maintenance
Keep the area well‑ventilated and traffic‑free for the full cure period. Once cured, sweep regularly and mop with a neutral-pH cleaner. Avoid abrasive pads or harsh chemicals to preserve the glossy finish and extend the life of the coating.
What Are The Key Considerations For A DIY Epoxy Floor Coating In NYC?
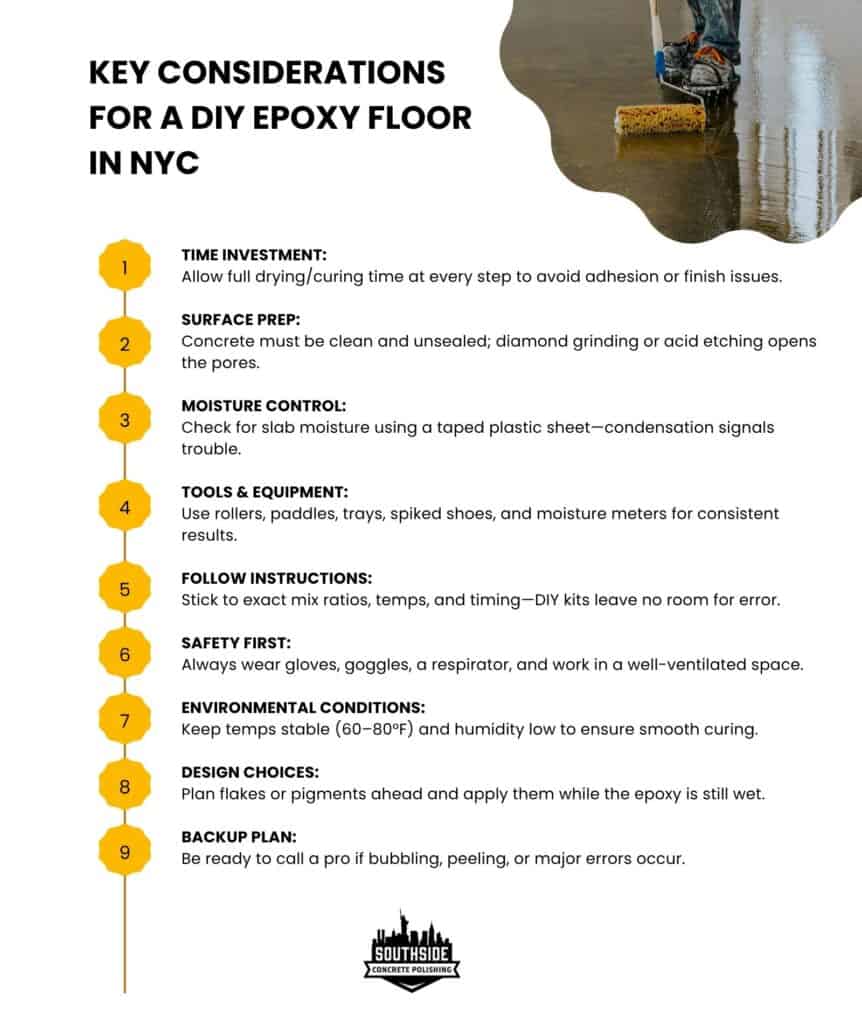
The key considerations for a DIY epoxy garage floor in NYC include proper timing between application phases, thorough surface preparation, moisture control, and using professional-grade tools. Additional factors involve following exact manufacturer instructions, maintaining safety.
Here are the key considerations for a DIY epoxy floor in NYC:
-
Time Investment: Each stage, cleaning, etching, patching, and curing, requires its own full drying window, and rushing any step creates poor adhesion and uneven finish.
-
Surface Preparation: Concrete must sit unsealed and remain dust and stain free. Aflooring contractor in New York City uses diamond grinding to open pores quickly, while acid etching under proper ventilation and protective gear achieves similar results.
-
Moisture Control: Trapped moisture leads to bubbling or peeling. Tape a plastic square to the slab for 24 hours, and condensation under the sheet signals the need for a moisture mitigation system before coating.
-
Tools and Equipment: Gather rollers, paint trays, mixing paddles, spiked shoes, and a moisture meter. Proper tools ensure consistent coverage, controlled pot life, and a professional-grade finish.
-
Exact Adherence to Instructions: DIY kits from Home Depot include precise mix ratios, temperature windows, and pot life guidelines. Deviating from these instructions compromises chemical bonding and surface hardness.
-
Safety Precautions: Wear chemical-resistant gloves, eye protection, and a respirator during etching and mixing. Ensure adequate ventilation when working with acids and epoxy vapors.
-
Environmental Conditions: Maintain a stable temperature between 60 to 80 °F and low humidity. Extreme heat, cold, or moisture in the air disrupts curing and creates surface defects.
-
Design and Aesthetics: Decide on color chips or metallic pigments in advance. Broadcast decorative flakes while the epoxy remains wet and remove excess before applying a topcoat.
-
Backup Plan: Even with careful planning, installations sometimes go awry. Keep a professional contact ready in case patchwork or full floor remediation becomes necessary.
Should You Coat A Garage Floor With Epoxy?
Yes, you should absolutely coat your garage floor with epoxy. Epoxy coating transforms your garage from a neglected, cracked space into a durable, beautiful area that will serve you for decades. Unlike paint that chips and peels within months, properly installed epoxy creates a rock-hard surface that withstands heavy traffic, dropped tools, and chemical spills for 20+ years. Oil stains, dirt, and garage messes wipe away easily from epoxy surfaces, requiring only a quick sweep and occasional mopping to maintain that brand-new appearance. The sleek, professional look dramatically improves your garage's aesthetic while providing long-term value that eliminates the need for frequent recoating and repairs.
Proper surface preparation and application are crucial for epoxy's performance, which is where professional expertise becomes essential.Southside flooring contractors**** bring the specialized knowledge needed to ensure your epoxy coating adheres correctly and delivers maximum durability. Their professional installation guarantees you get the full benefits of this superior flooring solution, avoiding the common pitfalls of DIY applications that lead to premature failure. Don't settle for temporary paint fixes that require constant touch-ups -- invest in professional epoxy coating and enjoy a garage floor that looks great and performs flawlessly for years to come.
How To Paint A Basement Floor With Epoxy in NYC?
In NYC, to paint a basement floor with epoxy, you need to clean and prepare the concrete surface, apply primer, mix the epoxy components, and apply multiple coats with proper curing time. However, DIY epoxy installation often fails due to improper surface preparation and application techniques. Instead of risking poor results, let Southside Concrete Polishing handle your basement epoxy professionally -- we use diamond grinding equipment for proper surface prep, quality materials, and expert application techniques. For professionalepoxy flooring services that deliver lasting results, contact us at 646-760-4442 for your free estimate.